
My bathroom currently looks like the picture above. Tile and mortar board are out everywhere except under and directly surrounding the toilet. And the only reason we didn't remove the tile there is because that entails taking out the toilet, and we're too lazy in the middle of the night to use the hall bathroom.
But I digress.
You might notice in the picture above that there are two kinds of flooring showing, and that can be explained quite simply. The board at the upper right side is the floor itself. The lighter colored flooring in the lower left section is a subflooring that was fit in on top of the floor itself to help support the tile that used to be there. That subflooring is all going to stay, save for a small piece that will probably be about 6' long by 1' wide and currently sits in front of where the tub has been for the past 20 years. That section's got some water damage that needs to come out, so the plan is to buy a small piece to fill that gap after the new tub is in.
But I sort of got ahead of myself there. So let me back up, because after Darrick removed the tile and mortar board and before the tub ended up on its side leaning against the wall, we had to do a lot of work. At the drain end of the tub, there is a wall that separates the tub/shower from the toilet, and the bottom 15 or so inches of that wall had rust on the edge piece. I attempted to just remove the very bottom, where rust was visible, but once we started to remove that, it just started to make sense to remove the whole strip, all the way to the ceiling. At least, that's what my husband apparently thought, since I had removed just the rusty part nearest the floor and was downstairs watching the kids, then later came up to see this:

So, in case anyone ever wondered what the inside of a wall looks like, there it is. The left side of this picture is the shower/bath side, with plumbing running up through the wall. Starting from the furthest layer out, you have paint, Greenboard (looks like drywall, but is water resistant and sometimes used in tub and shower surrounds when covered by another waterproof layer), then the stud. The side of wall facing me shows more drywall covering the broad side of the stud, as well as the paint which is peeled back from the edge piece being removed.
Once that was done, we had to finish removing the shower surround, which was easier said than done. We'd already removed the piece at one end, but before we could get the back wall off, we had to remove the end that all the plumbing fed through. That meant we needed to remove the fixtures in the way, including the shower head, faucet, and spout. And if you're already in there doing that, you may as well figure out how to take out the overflow and the drain, right?
FYI, regarding the drain, you need a tool. If you're like me, you'll go online and watch some videos of people removing the drain in their tubs and google the tool name only to find it costs $70. And you'll want to cry. And THEN you'll realize that the same thing is sold at Home Depot for just under ten bucks.
The upside: It cost $60 less in store than online prices had me believing, which meant we didn't feel bad about going ahead and purchasing new tub/shower fixtures while we were there.
The downside: There is no way to get a picture of yourself holding this thing (intended to show anyone who may be wondering just what kind of tool one needs) without it looking phallic. I mean, c'mon...

Am I right? Of course I am.
Anyhow, once that was taken care of, we tore out the rest of the shower surround, which had to come out in pieces. And then we were ready to yank out the tub.
Which is about as easy as removing a 5 foot long, almost 2 foot deep fiberglass beast sounds. According to YouTube, we just had to get a hammer's claw between the tub's edge and the open space in the vertical 2"x4" beams in the room. Except, of course, it wasn't that easy. first off, the Greenboard was in the way. Second, there was a horizontal beam around the top edge of the tub in many places, meaning there was no gap through which to place the hammer. And third, have I mentioned how huge this tub really is?
Long story short, after trying the hammer, the pullbar we used to install the floors downstairs, a shovel and a metal bar for leverage, and a large metal file tool, we weren't really getting anywhere. The most Darrick could do was shimmy the tub about 5" off the floor on one end, and it would get stuck.
In a moment of desparation, I went down to the garage to get the car's jack in hopes we could fit it under the bottom of the tub and jack that fucker out of its spot. But it was not necessary, because while I was downstairs Darrick took the sledgehammer to the tub's corner and popped out some fiberglass so it would come out without getting caught.

A piece of the tub that got beaten into submission.
And at long last, we return to that picture up top, with the tub victoriously propped on its side and officially removed.
Aside from watching in awe and attempting to stay the hell out of Darrick's way, I also started removing the countertops so we can pull that sucker out as well. The end pieces are separate from the remainder of the counter, and with a little finesse with the utility knife I cut through the caulking and used a putty knife (improperly, no doubt) wedged behind one edge to pop it away from the wall.

It came off relatively easily and clean, leaving just a little adhesive which was easily pried away without damaging the drywall behind it.
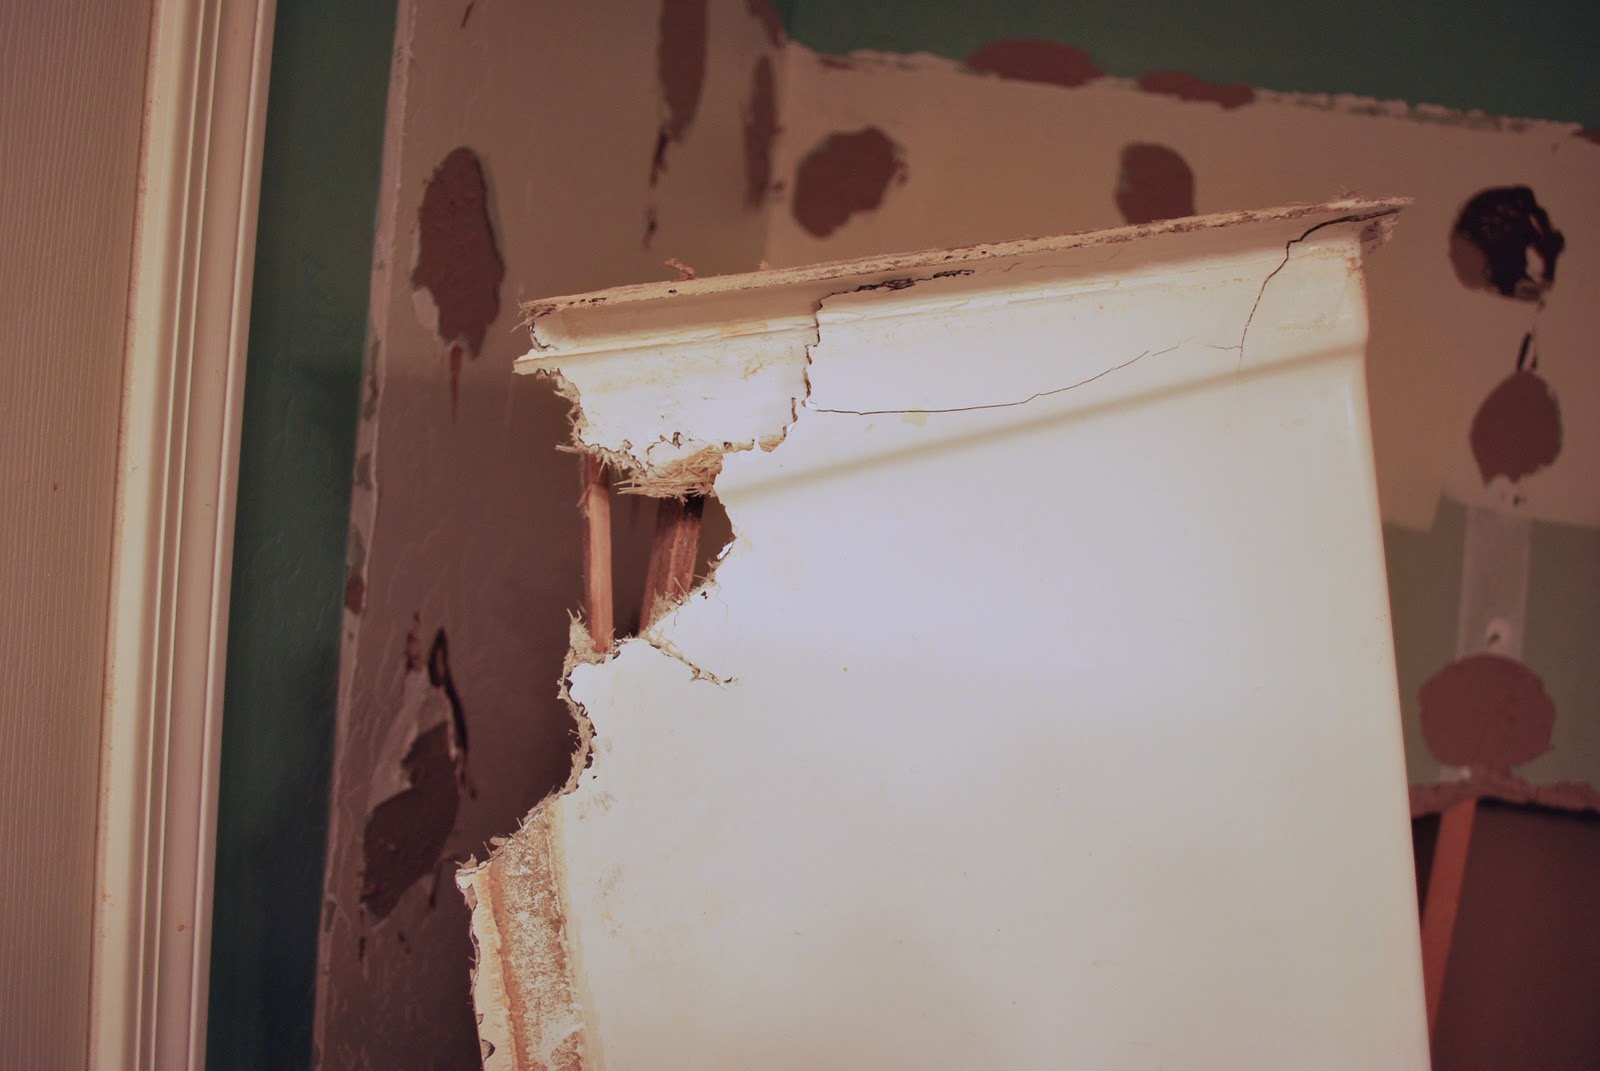
Sadly for the other end of the countertop, my husband got a bit antsy and worked some 'magic' on that piece while I was out of the room. And herein lies visual evidence of why my husband should be trusted with sledgehammer-style demolition and I should handle the finer details:

I know this picture sucks big time, but in case it's not clear, he tore away two large chunks of drywall in the process. So much for the hope we might not need to patch any drywall on this side of the bathroom when all is said and done.
Next up, we need to haul out the tub and remove the faucets and countertops. Then the Greenboard gets replaced. The replacement tub we bought for a song and a dance at the Habitat for Humanity Re-Store needs a surround to be built before we can drop it in. In the meantime, however, we'll be searching for a new countertop and finding a way to add a riser to the top of the cabinets so that the new counters sit at a more erasonable height for us both.

No comments:
Post a Comment